Recently I’ve been looking into the idea of making decorative scene breaks in books, or even just coming up with some interesting fleurons that might be embeddable. This led me to look up how Celtic knots are made—a thoroughly interesting subject, of which I’ve only scratched the surface—as I had a knot-like idea I wanted to try. Having finally succeeded in making something awesome, I thought I’d share the process. It actually makes a nifty little intro to Inkscape, and if you’ve never used that before, you should. Inkscape is a free vector art program and it’s great for all kinds of things: icons, decorative elements, you name it. I made the glyphs and waves for my first book’s cover in Inkscape, and also used it to lay out the text for the back cover.
Here’s the knot I made, at 200% size:

This is a tutorial meant to be used by beginners,, so I’ll explain some of the tools but I’m not going to go nuts taking screenshots of every single thing. If you haven’t downloaded Inkscape yet, install that first. If you’re an old hand with Inkscape, you know which parts to skip. Now let’s begin.
Step 1: Create a new document. Edit the document properties (this is in the File menu, but there’s a toolbar icon for it too), and change the width and height both to 100 px. While you’re still in properties, switch from the Page tab to the Grids tab. Create a new rectangular grid, and the defaults will probably say the origin is 0,0 and the spacing is 1 px for both X and Y, with a major grid line every 5 lines. Does it say that? Then we’re good to go. Zoom in a bit; I like 400% zoom for this job, at least in the early parts.
Step 2: In the list of drawing tools on the left, around the middle there’s one that says “Draw Bezier curves and straight lines”. That’s the one you want. Start on the middle left, at coordinate 0,50. If you look at the bottom of the window it should say you’re right around 0,50, and snapping should already be enabled so this should snap right to the grid. Click there. Then click the rest of these points, following basically clockwise, until finally you end up at 0,50 again. Once you click that point it should close the shape. If any of these points are off, don’t worry; they can be fixed in step 4.

Step 3: Chances are the image doesn’t look like this, because you need to change the fill and stroke settings. So go to the Object menu or the toolbar, and select Fill and Stroke. This should open up a panel where you have fill and stroke settings. In the Fill tab, change the fill to none (click the X). Then go to the Stroke paint tab, and select Flat color (if it isn’t selected already), and make that color black with full opacity (alpha should be 255). Now over in Stroke style, we want a width of 5 px. The Join option should be the one that looks like a square corner, because we want nice sharp corners. Miter limit should say 4; that’s a fine default for this so just leave it. The cap—what the ends of your lines look like—should be the one that’s short and flat (Butt cap), which basically means the stroke for the line doesn’t extend past the line itself.
Step 4: This is mostly just to see how the curve looks so far and introduce you to the node tool at the same time. In the tools on the left, the first one is the Select tool. The second one down lets you edit paths by nodes. Click that, and you should see all the nodes in the path; there will also be a toolbar for things you can do with nodes. If any of your nodes are in the wrong place, you can drag them where you want. Now click and drag a rectangle that catches every node except the four corners; if you do catch one of the corners by accident, you can Shift+click on any node to remove it from the selection, or to add it. Once every node except the corners is selected, click the toolbar icon that says “Make selected nodes smooth”; it looks like a square node instead of the diamond shape these have. The result should look like this:

This is a very pleasing shape already. Note the curve handles to either side of all the smooth nodes; they control the curvature. We won’t be messing with those, but they’re something you can play with in your own designs. Now I wanted to do something oblong, so this isn’t quite right yet; hit Undo and we’ll deal with that.
Step 5: Now that we’re back to all straight lines and cusp nodes (the kind that aren’t smooth), choose the Select tool. On the toolbar you should see this object’s coordinates and size. The size shows up as 105 by 105 px for me, which is kind of weird since the path actually sticks out past that with the join type we use, but that’s actually good for our purposes; it’ll make this easier to shrink. If you figure this is actually 100 by 100—counting only the nodes—those 5 px basically account for the stroke width. So that means if we want something half as high, it’d be 50 px high plus 5 for the stroke width. So change the height to 55. Now go back to the node tool. All the nodes should be lined up on the grid still, half as high as they used to be.
Step 6: Repeat the node smoothing we saw in step 4: Select all nodes except the corners, and click on the icon to make them smooth. Notice now we have a problem: the lines practically all meet in the center. This won’t do at all. So first, Undo. Now with all those nodes still selected, go up to the node toolbar and the first icon should say “Insert new nodes into selected segments”. Click that icon. Every line segment that’s selected—there are four—will be divided in half by a new node, right at the midpoint. I don’t like where these midpoints ended up, so I’m going to drag them closer to the center horizontally. While I’m at it, I’m also going to take the nodes on the left and right that are next to the corners, and drag them outward vertically, so the curve will widen out there.

Now let’s try the smoothing again: once again, using all nodes but the corners. This is more like it! Leave these smoothed this time.
Step 6b: Minor thing here, but let’s make this easier to work with by moving it back to the center. Three ways this can be done: 1) You can go to the Select tool and drag this shape up to the center. 2) In the node tool, select all nodes and drag them up to the center. 3) Open up Align and Distribute, which is in the Object menu and also the toolbar, and click the icon in that panel that vertically centers the shape. Heck, try them all. Now we move on.
Step 7: This doesn’t yet have the nice ellipse passing through it, so go to the Bezier tool and draw in a diamond shape. The corners of the diamond should be aligned with the nodes in the first shape, like so:

Now select all of those nodes and make them smooth. Instant ellipse! If you had a perfect square, it’d turn into a circle. Finally, we have our building blocks, but we don’t have the nice knot effect. This is where the rubber meets the road.
Step 7b: I like to keep copies of things around in case of emergencies, so go to the Select tool and select both shapes—you can draw a rectangle around them or just do Select All in the menu. Hit Ctrl+D to duplicate them, and then hit Shift+Down a few times until the duplicates are moved off of the page. You may want to zoom in for the later steps.
Step 7c: As you can probably tell, there’s going to be some cutting. First we have to plan out which parts of this knot will be on top and which will be on the bottom. Starting at the far left and working clockwise, I was thinking the first crossing should have the “leaf” corner go over the ellipse, and then it should go under at the next crossing, and alternate until we’re done. At this point we also want to decide how big the gaps should be, and I’m going with 1.25 px; that is, each line should have that big of a gap to either side where it crosses over another line. That’s ¼ of the stroke width. The gap size is a matter of personal preference, but it factors into what we’ll do next. For this pattern, I don’t think you can go much bigger.
(Stop! After posting this tutorial originally, I realized there was a much better approach to cutting out the pieces. This is all good stuff to read through for reference, but I posted a better way to do this in part 2. Before you go, you’ll need to know the term “stencil” defined in this next step.)
Step 8: I’m going to begin defining some places where we’ll be cutting. I’m calling these pieces stencils, just to have something to call them. Each stencil will be an enlarged version of a path, cut into pieces, and will represent places where that path will be going over another path. For example, we’ll start with the ellipse. Select it, and duplicate it with Ctrl+D. In Fill and Stroke, change its stroke color to something different, like maybe a dark orange, and we’re going to change the stroke width to 7.5 px. That’s the normal 5 px plus the gap on both sides. This is the ellipse’s stencil, so it’ll be used for every place the ellipse goes over the leaves. I decided that the left leaf crosses over the ellipse in the northwest corner, and under in the southwest; so the stencil has to exist in the southwest corner for that leaf.
Step 8b: It’s time to cut up the ellipse stencil. Go to the node tool. See how we have four curved line segments. They’re all too big. The southwest line segment is one we want for the left leaf, but not for the bottom leaf. So select all of the nodes, and hit the icon that says “Insert new nodes into selected segments”. Now we have eight nodes and eight segments. Select the line segment between the south and southwest nodes. I kind of want to delete this segment, but the southwest node is still a little too close for comfort to where we want it, so let’s give it a little more slack. Click the Insert nodes icon again to subdivide this. Now we have a south-by-southwest node that’s in an even worse spot, so click the segment between that and the southwest node, and Insert again. Finally! Click the line segment between that new node and the SSW node, and in the node toolbar, there’s an icon that says “Delete line segment between two non-endpoint nodes”. Click that.

Step 8c: As you can see, the SSW node is hanging over a part where we want the ellipse to go under the leaf, so delete that SSW node. Now we’ll want to repeat this process in the northeast quadrant. The WNW and ESE segments can be deleted too, but once again the nodes are a little too close to the leaf pattern, so it’s time for more subdividing. The final ellipse stencil should look like this:

Step 9: This next stencil is easier: Now we want one for where the leaves go over the ellipse. Select the leaves and duplicate, and then once again we’ll change the stroke width to 7.5 px, and change the color. This’ll be a different color, maybe a lighter orange. At this point it should be clear how to select the line segments you want to delete, and delete them, so do that until you get this:

Step 10: Now we move onto the stencil where the leaf pattern crosses itself. This stencil isn’t too hard to make, but it will be a little trickier to apply when the time comes. Therefore this stencil is going to be in two parts. We’ll do the first part the normal way: Duplicate the leaf path, change the stroke width to 7.5 px, and change the color. This’ll be a dark red. We have four crossings: west, east, north, and south. The west crossing will go over in the NE to SW direction, and under in NW to SE. So the stencil in this spot has to go NE to SW. The east crossing is the same, and that means the north and south crossings go the opposite way. We’ll need to do some subdividing on the west and east parts, like we did on the ellipse, because the crossings come really close to each other. One thing to watch out for is making sure that the north and south ones are long enough; when in doubt, subdivide. After doing the usual dance of subdividing line segments and deleting the ones we don’t need, you should end up with this:
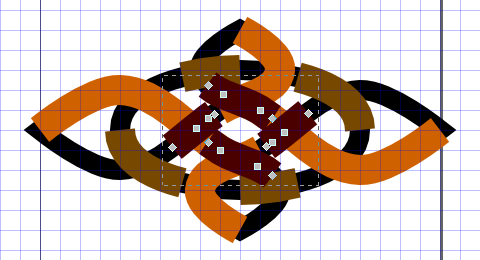
Step 10b: I did say this stencil is more involved when it comes time to apply it—this is because it’s for the same shape crossing itself—so we’re going to duplicate it. Change the stroke width of the duplicate back to 5 px, and make it a lighter shade of red.
Step 11: It’s cutting time! First, let’s select all of the shapes here. Just drag a rectangle over the whole area. In the Path menu, choose Stroke to Path; this will convert these lines into filled shapes, no longer just strokes.
Step 12: Switch to the Select tool. Click the ellipse, then Shift+click the light orange stencil (the one where the leaves cross over the ellipse) so they’re both selected. With both objects still selected, go to the Path menu and choose Difference. The stencil, which is on top, is subtracted from the ellipse which is on the bottom.
Step 13: Now let’s deal with the darker orange stencil, where the ellipse crosses over the leaves. We’ll be cutting this away from the leaf pattern, so select the leaf pattern and also the dark orange stencil. Do Difference again.

Step 14: This is already looking pretty good, but we haven’t dealt with the stencil yet where the leaf crosses itself. So this is the big one. First, remember we had two parts to this stencil: the lighter red in the middle that’s only as wide as our regular path, and the darker one on the outside that’s stencil-width. Select both of these, and run Difference. The darker stencil is now four sets of somewhat parallel curves. Now select the stencil and the leaf, and run Difference for the last time.
Step 15: This is the annoying part, but it’s necessary because as you may have noticed, not all of the curves line up perfectly because of subtle inaccuracies. Thanks to that, there are some spots on the leaf now that we have to clean up. I’m going to make this a little easier here by taking advantage of the symmetry and cleaning up just half, then duplicating the result. So select the leaf and go to the Path menu, and choose Break Apart; this turns the path with eight separate parts into eight separate paths. Delete the north and east leaves, and the north and east crossing pieces inside the ellipse.

Step 16: Zoom way in on the areas near where we just cut, starting with the interior crossing pieces on the west and south sides. Use the node tool and select any group of nodes that are way too close to each other; these are artifacts of the Difference operation. On the node toolbar, select “Join selected nodes” and they’ll become a single node. Do this anywhere you see nodes that are too close together. There may be cases where it looks better to delete a single node, as long as it doesn’t change the path too much. This image circles some of the biggest problem areas in red, and some places where nodes could be combined to simplify the shape a bit are in orange.

Step 17: Now that the paths have been cleaned up, zoom back out and select all the parts of the leaf pattern that are left. In the Path menu, choose Combine. Switch to the Select tool. The leaf is already selected, but click it again and you’ll get the rotation handles. The center of rotation should be in the middle; drag it to the center of the page. Now hit Ctrl+D to duplicate. In the Object menu or on the toolbar, you’ll have options to rotate the shape 90° or flip it; rotate it twice or flip both ways (horizontal and vertical), and now we have the northeast parts of the leaf again.
Step 18: This is the final step! Select all the pieces: the two parts of the leaf, and the ellipse. Go to the Path menu and Combine. Now just delete the old backup copies that were dragged off the page earlier, and we’re done. In the end you may want to change the page dimensions and re-center the knot within it, since it doesn’t quite actually fit 100 pixels of width and 100 pixels of height is too much.
And that’s my Celtic knot. The stenciling technique is what’s most important to the Inkscape veteran, if they haven’t done something like it already. Inkscape does have a path effect caled “knot” that you can apply, but it doesn’t really work the way I’d like it to for this purpose; hence the need to do it the hard way.
If you want to take any shapes you make this way and fontify them, you can use a tool called FontForge and import your .svg files from Inkscape into that. However, the first thing you should probably do is break apart the path, and then using the node tool, make sure all the pieces of the path have their nodes running clockwise. If they don’t, go to the Path menu and reverse that path. Once this is done for all the pieces, they can be Combined again.
Where I think this method has the most appeal, though, is in book covers. You can really dress up your covers with nifty accents like these, as long as the genre is appropriate. Play around and have fun coming up with your own knots!


Decorative and Ornamental(Celtic, Chinese and much more) knots include how to make
http://www.craigmarine.info/accessories/fishing_equipment/Decorative-and-ornamental-knots.htm ..my be interesting